I chose to read Mrs. Piggle Wiggle with my kiddos because it was light, short, and funny. I also discovered that through each chapter, we could have great discussions about good and bad behavior.
I developed a Read Aloud Experience to go along with the novel. If you are not familiar with the Read Aloud Experience, check out this post.
In short, it includes the following: chapter summaries and questions, optional crafts and activities for each chapter, and library topics to guide you in checking out books that go along with the themes.
This post contains affiliate links. If you follow one of my links, I earn a small commission at no extra cost to you. Thank you for supporting my blog!
There was something special about this book that made me take it a little further.
Every chapter follows a child that is making bad decisions or forming bad habits. The parent calls Mrs. Piggle Wiggle to ask for a “cure” for their child. It is all very fictional and humorous but the behaviors are applicable to real life.
The best part was we could giggle about the silliness, but then have real discussions about good character. We talked about behavior and responsibility in our own home – and most importantly we backed it all up with scripture.
When the characters refused their bedtime, we researched Van Gogh and recreated Starry Night
Every chapter in this Read Aloud Experience includes a bible verse to use as a devotion with your family.
I love when a book leaves an impression on you, and to this day we refer back to the characters in the chapters and what we learned from them. We even memorized a few of the verses and can recite them in certain situations.
There are 8 chapters in Mrs. Piggle Wiggle, and I’ll outline the biblical focus points below:
Obey your parents
Generosity
Use kind words
Greed
Patience
Rest
Thankfulness
Arguing
Sound like topics you might want to discuss in your family?
My oldest two children were 6 and 4 when we read this. So, don’t assume your children are too young! I have even thought about doing this again in a few years. It’s great for all ages! All of these topics come up in our home on a regular basis and it was so nice to be able to sit down and discuss them together.
We homeschool our children and loved using the verses as our devotion, reading a chapter a day, and completing the optional crafts and activities. If you do not homeschool, you could still easily use this book to talk about the character traits listed above.
When a character refuses supper, we got creative with food by completing this marshmallow STEM activity.
Everything in the Read Aloud Experience is optional and it’s meant to be flexible for all families.
Think of it as your guide. There are so many ways you could make it work in a way that fits your family. Simply read a bible verse at dinner and a chapter before bed.
Save it for the weekend! The chapters are short. Read two on Saturday and two on Sunday and you’ll be done in two weekends!
Download the unit for a spring break or summer activity. It would be the perfect thing to add a small bit of structure/routine to your day.
If you wanted to use it to its full potential, check your local library for books that go along with the topics listed in the unit. Use the supply list to make sure you have the ingredients for recipes and craft supplies. Since this book is so short, you can get everything you need in one swoop so you’re ready to go!
In our family, we used the bible verse as our daily morning devotion. I read a chapter a day (usually while the babies were napping). Then, we would complete the activities we had time for. I usually save library books for after dinner/before bed. It’s the easiest way to add them into our day.
I always randomly select library books based on a specific topic. I love the fun and surprise in this. We did come across some great ones and I will share them below if you’d like to search for them specifically:
We read many more throughout the unit, but these were our favorites.
Our “Un-Selfish Kit” inspired by Mrs. Piggle Wiggle’s kit – We discussed actions that were kind and not selfish.
If this Read Aloud Experience sounds like something you’d like to look into for your family, you can download the entire unit for FREE in my store.
Pick and choose how you want it to work for your family and enjoy digging deeper into a book. (Download the unit here.) I love how my children and I really become a part of the book when we do this. We get to know the characters as if they are a friend. We experience new things and get to be creative. You could say it’s almost like we are in the book ourselves!
Teaching preschool to my four year old has been such a rewarding experience. The amount of growth that happens between 4 years and 5 years is incredible, and to be able to witness that in our homeschool has been such a privilege and joy.
I’ll admit I was terrified at the beginning. This was my first year to homeschool preschool because my oldest daughter completed pre-k at a school while I was still teaching.
We were basically starting from scratch. When my second daughter was three, we briefly practiced letters, but they didn’t stick. She knew how to write her name and could recognize the letters in it, and that’s about it. I knew the alphabet would need to be a focus of ours, so that was my goal. I would teach her to recognize her letters, write them, and learn their sounds.
This post contains affiliate links. If you follow one of my links, I earn a small commission at no extra cost to you. Thank you for supporting my blog!
My daughter’s personality is not the type to sit at the table for a long period of time to complete something.
As a result, I didn’t want to buy a ton of workbooks. I planned to encourage a lot of play – imaginative and learning based. I also wanted to go at her pace while still challenging her to put an effort into completing a little something on paper each day.
In this post, I’ll be explaining what we started with at the beginning of our preschool (4 years) and how it changed throughout our homeschool year.
We started with Learning Without Tears for writing.
I felt like this was a great choice for us because it starts off very easy with the first book. The workbook is called My First School Book.
There are no lines or boxes to stay in. It’s simple tracing of a shaded letter. The book begins with color review and then introduces one letter at a time. The letters are not introduced in ABC order. The book also introduces writing numbers. I did not purchase any teachers guide or any of the extra supplies, and we completed one page per day.
Since the lessons were so short, this was the perfect way to start challenging my daughter to complete something in a workbook. It took very little time and she felt successful and confident.
I wish I would’ve bought the set that comes with My First School Book plus My First Lowercase Book.
It’s only a couple dollars more, and you can not buy that specific lowercase book separately. So, when we finished My First School Book we had to move on to the workbook called Kick Start Kindergarten.
The Kick Start Kindergartenworkbook begins with capital letters. This time the letters must be written inside of a shaded box. This made me nervous at first, because I thought it would be frustrating for my daughter. However, once we practiced a few times, she understood.
Once the capital letters are reviewed, the book moves into writing lowercase letters. These are learned on the two lines that the Learning Without Tears program is known for.
I enjoy that the lessons are short and so does my active daughter. I also like how the lessons in the workbook include pictures and words that start with the letter practiced. This allows me to introduce and practice letter sounds as we learn to write them.
I haven’t decided if I’ll continue with Learning Without Tears for Kindergarten next year. I love their program starting out, but I am definitely a fan of the old fashioned three lines. I’ll always do what’s best for my daughter, so I’ll need to test that style out with her first. I’m also not a fan of the Learning Without Tears cursive style, which I know is a few years from now, but I still like to think ahead as we start the handwriting process.
I purchased one other workbook from Singapore Math for our preschool year.
The book is actually called Essential Math Kindergarten and there are two books in the set. I was able to purchase Book A on its own from our local homeschool store. I’m glad I only bought the first one, because we did not make it very far into this book before stopping.
Although the book states “kindergarten”, it’s actually perfect for Pre-K4. It starts off very simple and moves slowly. I bought it because it came highly recommended by an experienced homeschool mom. She had used it for multiple children at age 4 and loved it. We did not feel the same in our house.
To be frank, the book is boring.
There is no color on the page. My daughter never wanted to sit and color the pictures. Some days it took us 4 seconds to complete a page, and I felt like saying…”That’s it?”
At the bottom of each workbook page, there are activities that you can do with your child to help practice the concept, but we never really looked at that.
I just felt like the book was a waste of time. The focus was on early math skills: shapes, counting, patterns…We can experience so much more learning with a bucket of play dough or a puzzle and have a lot more fun! We made it about half way through Book A and stopped. At this point, I knew I wanted a new plan for practicing math skills consistently.
My goal for the preschool year was to teach the alphabet and the letter sounds.
I’ll be honest, after a couple months into the year, it was not going well. The handwriting pages gave us some review, but I was having a hard time being consistent. My daughter needed repetition and I wasn’t finding it anywhere. Scratch that – I always got lost in the internet world trying to find the perfect solution.
At this point in our year, I knew what I needed: daily, consistent alphabet practice + preschool early math skills.
Enter the Alphabet Workbook…
This is the curriculum that changed our school days. The Alphabet Workbook allowed us to practice the math skills we needed (shapes, numbers, counting, etc…) while also learning the letters each day of the week.
It’s set up to be engaging, fun, and consistent. It’s the perfect resource for learning a letter per week. Every letter has four completely different pages of activities to practice recognizing, tracing, and writing. Coloring, dice games, graphing, cutting, ten frames, dot markers…this is just a glimpse into the variety!
The activities are fun for my daughter and flexible for her learning style.
It can all be completed at my daughter’s pace. If she seems really focused and eager to work, I can encourage her to complete the “challenge” listed at the bottom of many of the pages.
If she’s having a rough day and not willing to focus as much, we can take it slow and complete as much as we can on the page.
When we started using the Alphabet Workbook, my daughter was finally able to recognize and remember her letters.
When our year started, she only knew the letters of her name (most days). Once we had more consistency by using the Alphabet Workbook, my daughter was finally remembering her letters! It was such a relief! She was even recalling the letter sounds thanks to the pictures and words included in the workbook.
We are almost finished with the workbook at the time I write this. Now that it is in our routine, she is even starting to do many pages independently. She recognizes the patterns of the pages and completes some on her own. It’s been amazing and such a joy to watch her grow and mature like this during the year.
The confidence I gained from her success and the consistency of the workbook gave me so much peace in planning our homeschool.
Many people tell you that when you homeschool preschool all you need is PLAY. Ok…I support this thought. Play is so important for young children and we do a lot of it at our house, but hear me out…
As the mother (and teacher!) of my children, I do tend to question if I am doing enough. Maybe you’ve experienced those same feelings.
This is why I love the Alphabet Workbook so much. It is not rigorous. It is fun! It’s engaging and playful and colorful and easy to complete. It helps my brain and my sanity to know that she has completed something. I do a lot less questioning of myself knowing she has done this one small task.
Now that she knows her alphabet and sounds, she has shown an interest in reading!
We purchased ABC, See, Hear, Do and it’s absolutely wonderful! The book is set up to learn the sound of a letter along with a physical action. It’s colorful, adorable, and easy to follow!. The day we got it, she read her first word within minutes. I was shocked! Completing the book means reading 55 words – such a fun accomplishment for a little one!
Once she starting blending sounds together, I knew she was ready to start reading a little more. Honestly, I don’t think I was ready…. (ha!) So, we are going the slow route. I purchased the first set of the Bob Books to start reading with her. We do this VERY slowly. I help her get through a book and we read it over and over throughout the week. She is gaining confidence but also practicing reading skills.
I am not expecting her to learn to read this year, but she shows a ton of interest and is ready to start so we are having fun with it. I try to have her read with me a few times a week. Since she is still so young I do not push it. If she starts to complain, I simply say, “Let’s try this again a different day!”
Everything else that we complete in our school day involves all of my children.
I’ll explain these briefly if you are interested, but I won’t go into too much detail as I only expect my preschooler to really “tag along” for these things.
We are in a Classical Conversations Community.
We attend Community Day once a week for half a day. Each day of the week we spend about 20-30 minutes practicing memory work that covers Math, Science, History, Latin, English, Geography, and the Timeline. We do a lot of singing for this. At age 4, it’s laid back and fun.
You can read more about how we add it to our day HERE. If you are considering joining Classical Conversations and have some questions, check out THIS post.
We love reading novels together and enjoyed completing The Read Aloud Experience this year.
Sitting together with my children and reading a good book is my favorite thing to do. I love it even more when we can do simple activities that relate to that book, even if it’s a small discussion, simple craft, or a recipe to follow!
The Read Aloud Experience is a fully planned, FREE novel unit that provides all of the activities that go along with the story. We had so much fun doing these units and it gave us something to look forward to each day! We read The Secret Garden and Mrs. Piggle Wiggle.
The Secret Garden is absolutely wonderful if you have older children as well. Mrs. Piggle Wiggle is hysterical and fun for all ages! Check out the FREE Read Aloud Experience for each book: The Secret Garden and Mrs. Piggle Wiggle.
Our family devotional allowed us to add a little extra science into our day.
I chose “Indescribable: 100 Devotions About God and Science” for our daily devotion. At the beginning of the year (before I had a baby and before Classical Conversations began) I used our library to gather books related to the science topic in the devotional. It was so fun and such an easy way to add science lessons in at this age.
This devotional is great! It is easy to read and interesting to both my children and me. Every devotion has a scripture verse, a biblical lesson, and a science lesson that relates. With a little planning ahead and a library card, I was easily able to add science into our week.
Some of the other devotionals we completed and enjoyed were seasonal. These included Truth in the Tinsel at Christmas and Resurrection Eggs for Easter.
The last thing I want to share is the digital resources that have been the most helpful for us this year.
These were specifically created for my four year old to help us practice what we are learning. You can see all of these preschool resources in my shop. Be sure to go ahead download the free ones: Early Addition Math Mat and Capital Letters: Trace and Find.
Our favorite resource that we use every week alongside the Alphabet Workbook is the Alphabet Play Dough Mats. It’s so much more than just making a letter out of play dough. These mats allow my daughter to write, trace, and find the letter in a group. Now, there’s even a set of Lowercase Play Dough Mats that we plan to use for Kindergarten!
Many of the things we complete in our homeschool day involve our whole family.
I love that so much about homeschool. We read together, play together, and learn together. Our big success this year was learning our letters and their sounds. We are excited to take these skills into our Kindergarten year! I can’t believe how fast the time is going with these little ones – cherish every moment!
Have you used any of the curricula mentioned above? Tell me about it in the comments. Or, share something you love for preschool!
Curriculum can sometimes feel overwhelming. As a parent, you want to do what’s best for your child. There are so many wonderful options out there, so what do you choose?
The answer to that question will always depend on your child. Even within a home, curriculum needs can be different. For example, my two oldest children do not always use the same books.
In this post, I’ll be sharing what we used for my oldest daughter for first grade and how it worked for us.
Every family is going to be different, but sometimes it helps to hear how something works for someone else. That’s what I hope to do here.
Keep in mind, this is all based on my opinion. What works for me may not work for you, and vice versa. I’ll be sharing the good and the bad experiences we have had this year.
This post contains affiliate links. If you follow one of my links, I earn a small commission at no extra cost to you. Thank you for supporting my blog!
We purchased Book 1 and Book 2, and that’s it. We did not purchase any sort of curriculum set from the company or the teacher guide this year. (I had the guide for Kindergarten and never used it.)
After my experience with kindergarten, I knew I wanted to have a few manipulatives on hand to use with the lessons. I purchased a small set of base ten blocks and uni-fix cubes. Both are used almost every week. I highly recommend having these to go along with the workbooks.
Horizons uses a spiral method to teach math skills.
This means topics are introduced and practiced throughout the entire book. The alternative to that is to introduce a topic, master it, and move on. Horizons is not set up that way. Each lesson reviews multiple concepts – old and new.
The student workbook is colorful and easy to follow. Lessons are usually front and back, and there are tests throughout. The tests look just like the lessons, so there is nothing surprising there. For the student, it may just feel like another lesson.
I would not describe Horizons as “open and go”, because at times there is a small bit of prep involved.
Once you get used to the book, the prep only takes a minute or two. Many curricula include a script for parents. In the Horizons student workbook, there are only directions for the student. You could definitely just have your child complete it, but I’ll tell you right now – that will get really boring really quick.
I’ve learned a little creativity is necessary, so I created math mats to make the planning and prep super easy! Having a go-to set allows me to just grab and go as I am getting the lesson ready. They are easy to store, easy to use, and fun to do!
Before we begin a lesson, I quickly look through the page and grab a math math that will go with it. I briefly look at the content to see if there’s any new skill to introduce. If so, I introduce that skill and help her practice. The rest of the lesson she completes independently. This works great for us because it puts less pressure on me. It only takes a minute or two for me to get it ready for her.
The teacher’s guide does include the steps to introducing the lesson and practicing the skill. It also gives an idea or two for an activity to do along with the lesson, but the guide is a separate purchase from the workbooks. Think of it as directions and not a script. (This was my experience with the Kindergarten guide since I did not purchase it for first.)
I personally love this curriculum because I can get creative at my own pace.
Or, if we want to just stick to the workbook page, we can. Some days it’s nice to just get it done! I don’t ever feel pressure to complete a planned out script.
I have four children and sometimes following a script gets tricky.
I love that the Horizons curriculum allows me to do as much or as little as I like, without feeling guilty. I can be creative and add simple activities. On the flip side to that, if I need to tend to other children or we need to work quickly, my daughter can work on her own without much help at all. For now, this is what feels good for our family, so we plan to stick with Horizons next year.
We started the first grade year with The Good and The Beautiful Level 1. When I first received the curriculum, it was exactly as it says – good and beautiful!
I loved all of the art and stories. It had activities and games within the workbook that we could play during the lesson. Everything was easy to follow and scripted. I always felt prepared when I taught the lesson, and I thought this would be perfect for us.
The Good and the Beautiful comes with a few different pieces.
There is the workbook, phonics cards, and a leveled reader with multiple stories.
I loved the reader because it was at my daughter’s level and the stories were really cute. The student is expected to read every day, but it’s not always from the reader. The reader was assigned in the lesson 4-5 times a month.
The included phonics cards are to be practiced a couple times a week. The lesson will specifically say when to practice the cards. Honestly, I used them maybe 2-3 times and then quit. There is no guidance on which ones to practice or whether or not to practice them in a certain order. There are over 100 cards in the set. It can feel overwhelming to practice them and, to be frank, it’s quite boring.
We started the curriculum in August and by the time we made it to Christmas, I made the decision to switch to something else. We did not switch because the curriculum was bad. We switched because it wasn’t the right fit for our family.
The lesson itself takes anywhere from 30-45 minutes to complete.
Add on phonics cards and shared reading time, and it gets to feel quite time consuming. This is another reason why I skipped the phonics cards. I wish I could sit and do school with my daughter one on one all day. But, let’s be honest, I can’t! With a new baby in tow, it became really hard for me to set aside so much time each day for just one subject.
Eventually, the lessons felt like too much.
We both became bored and started skipping things…I just knew we needed something fresh and different. We needed something that could be more flexible.
We decided to switch to Christian Light Education Language Arts.
I picked this program because it is sold in small booklets. You can buy an individual booklet or the whole set. I bought one booklet for less than $5.00, and I thought this would be a great way to try it out.
The Christian Light Education Language Arts is set up very similar to the Horizons math program I mentioned above. This could be why I ended up liking it so much. The program covers phonics, grammar, punctuation, writing, and spelling.
It introduces new topics and reviews previous skills throughout. It’s easy for me to teach my daughter the new skill, practice it, and then let her work independently. There are no stories to read, no games to play, it is straight to the point.
Now, this doesn’t mean we can’t have fun with it. I can easily create or search for some sort of practice game or activity If I want to. I do not own the teacher guide, so I am unaware if there are ideas for activities to add along with the lesson.
When we switched to Christian Light, I decided to use classic novels to read aloud and practice reading skills. I’ll share those later in this post.
I loved that we finally had time do read alouds because our workbook didn’t take as much time to complete.
I love reading novels with my kids, and I was having the hardest time fitting it in until we switched to Christian Light. I plan to stick with this program for second grade (See second grade curriculum review here), and I will purchase the guide. There are many days I wish I had it.
If you look on their website, there are many other helpful resources you can use to enhance your language arts. Phonics cards, information sheets, and a handwriting workbook are all options I can consider next year. Their reading curriculum also correlates with the language arts. (I plan to stick with classic novels.)
Once again (just like math), I like that I can be as creative as I want with this program. If I want to search for a game to practice, I can. If I want to just let her work, I can do that too. It’s flexible for us.
I don’t feel stuck to a script, so it works for this phase of our life.
If you enjoy a script, I would definitely recommend The Good and the Beautiful. It really is well thought out and thorough. When it comes down to it, I just needed more flexibility.
Science/History
We are part of a Classical Conversations Community, so we do not purchase a separate science or history curriculum. However, we have loved reading the “Who Was…?” series this year. We read a couple in the first semester, and I’d like to read more! They are such a fun and easy read.
Before I had my baby, we were using a devotional book to determine our science lesson. I’ll talk more about this book below, but we had a lot of fun with it. Whatever the devotion was about, I would check out specific books related to that topic from the library. It was easy to read and so easy to do! However, it did require planning in advance (to check out books in time).
We are not consistent with either of these two science or history supplements, but we do love adding it in when we need something new and fresh in our routine.
Bible/Devotional
This year we have been reading “Indescribable: 100 Devotions About God and Science”. This devotional is awesome! They are short and so interesting, even for me as the parent. Every day is a different science lesson related to a bible verse. We never get bored with it.
This book would be great for all ages. I used to teach 5th grade, and they would have loved this book!
If you have younger kids, you could definitely get creative and use this to help plan your science.
As I mentioned earlier, we did this at the beginning of the year, and it was a lot of fun. The only reason we stopped was because I had a hard time planning in time to get books from the library.
You know, this book would also be great for a summer read! If you take a break from your school books, you could still do mini science lessons along with the devotionals. Simply, look through the devotions for the week and check out library books on those topics.
Whether you use it to supplement your science or not, this was a great purchase! We will work through the rest of it this year, and I look forward to pulling it out again in a few years.
Handwriting
I chose The Good and the Beautiful for handwriting for two reasons. It was inexpensive and my daughter requested a program with three lines (with a dashed mid-line).
The workbook is put together well and can be completed independently. I love how there are lessons of good character and basic life skills like first and last name, phone number, and home address.
Each lesson has some sort of drawing or coloring activity at the bottom of the page. Eventually, we started skipping those, because my daughter was not interested. Overall, we were happy with it.
I think handwriting can be a tricky thing because it does get a little boring and tedious for the child.
However, I do think it’s good practice. I don’t know if we will purchase this one again only because I feel like it will be a waste to have all of the extra drawing and coloring that won’t get used. Most likely I will look for something without that.
I wish I would’ve read more this year, but with the new baby, this is one of the things that got skipped for a bit. We did read a few great ones that I will share with you.
Once I switched to Christian Light Language Arts, I really wanted to focus on a novel since the workbook did not have any reading portions (it’s a separate curriculum).
We started with The Secret Garden. We followed the free Read Aloud Experience that allowed us to have new copy work for handwriting and a simple craft/activity to do every day. It was super easy and it gave us something to look forward to every day.
The Secret Garden has 27 chapters, so it’s a definitely a time commitment. Even still, we thought the book was so wonderful and even enjoyed the movies afterwards.
I wanted our next book to be much lighter, so we chose Mrs. Piggle Wiggle. Once again we followed the free Read Aloud Experience. There is no copy work with this one, but we did add it into our devotion time, as each chapter is assigned a scripture verse.
We had a ton of fun with Mrs. Piggle Wiggle. Every chapter brought great discussion, and we continue to refer to the lessons we learned even after finishing. It’s great for all ages and it’s so silly!
It’s hard to believe we are headed towards the end of our first grade year.
Maybe you’ve thought about using something in your homeschool that I mentioned above. It’s even possible that you did use something and loved it, even though I didn’t. Whatever the reason is, remember that every child is different. You are the parent. You are obviously doing your research! (That’s why you’re here.) Be confident with what you pick, and jump in. You’ve got this!
I think when some people begin to consider adding Classical Conversations to their homeschool, they think it might be too much. It may feel overwhelming and hard to grasp what the planning will be like each day/week.
I think this because I did it two years ago when I began homeschooling. It wasn’t until my second year that I decided to take the leap and become a part of a Community. You can learn more about that in my previous post.
I’m so thankful for God’s guidance in choosing Classical Conversations, because we have been so blessed by the Community and the program itself.
This post contains affiliate links. If you follow one of my links, I earn a small commission at no extra cost to you. Thank you for supporting my blog!
So, how do we add Classical Conversations to our day?
Before explaining this, it’s important to know the ages of my children. I have two in Foundations that are 4 years old and 6 years old. I also have a 2 year old and a new baby that is 5 months old. All of these ages play a part in our day to day rhythm.
The easiest day to plan is Community Day, because it doesn’t change, and we have to be there. We meet once a week for half a day, and we really don’t do any other school work on that day once we are home.
Sometimes I may read from our read aloud or I might take some time to catch up on a subject, if needed. Most weeks, our Community Day is it. They do a lot of learning just in that half day, and you’ll see that as you continue reading.
Students in Foundations meet once a week for half a day.
Every community will have some differences, but the content should be mostly the same. We meet one day a week, and we begin at 9:15 for an opening, family presentation (like an introduction), and prayer.
At 9:30, students go to their classes and begin working on the new grammar for the week. Each part of the day is broken up into 30 minutes. The segments include new grammar, science, fine arts, presentation and review.
Pictured is one week of new grammar. If it seems like a lot, don’t stress! There can be a song for almost everything to make it so easy to remember and practice!
For new grammar, the tutor goes through each subject demonstrating the new material we will practice throughout the week at home.
It is repetitive and quick, but it’s easy to catch on and helpful to me as the parent. We memorize material for English, Latin, History, Geography, Math, Science, and Timeline. The topics we memorize will depend on the Cycle we are in. For more information on the way the cycles are set up, visit the website here. The cycles are explained toward the bottom of the web page.
Science consists of experiments and projects that encourage students to ask questions, make predictions, and reflect on an outcome.
Once again, this will look different for each cycle, but I love that every week is something new. Our tutor does a great job helping the kids get involved with their project and talk about what they are doing or observing. It’s also neat to see a group of 4-5 year olds reciting and singing the scientific method.
The Fine Arts portion is broken up into drawing, music, and great artists.
The drawing portion definitely challenges my four year old, but it’s in a good way. I’m right there to help her or if I step out, another parent jumps in. I like how it’s all planned out and structured with a goal in mind.
The music portion is learning how to play the tin whistle. If you don’t know what that is, just think about when you were in elementary school and had to learn the recorder. It looks just like that but smaller. To be clear, my four year old was not able to learn a song, but she was exposed to music notes and an instrument, and I love that. There was no pressure for her to master it.
Studying great artists has been the most fun for me, probably because I know the least about it. Currently in Cycle 3, we are studying the artists, and the children are practicing their drawing/painting styles. Most weeks, I want to jump in and try it too!
Presentation is a lot like a Show and Tell
I think the word “presentation” intimidates people, but that’s exactly why this is so important. By teaching the children to show up and speak in front of others, it is helping them gain confidence in public speaking. Some love it more than others. A few may need help or to be encouraged. The tutors are providing strategies and tips to overcome the fears and learn to be in front of others.
When I first started, I thought my child was going to have to make this big speech about something they learned. I imagined it super serious. It’s not that way at all from my experience in Foundations. I’m sure as they grow older, the challenge will be there, but for now it’s just about learning to present.
Everyone in our community is very supportive and encouraging when it comes to helping the kids present. I’ve stood up at the front with one of my children before. Sometimes, I’ve had to jump in and help my child remember what to say.
My 4 year old loves to look at me during her presentation and say, “What is it…?” I answer, and she’ll repeat. It’s a learning process for these littles. If you’re concerned about it, talk with a director in your local community.
The last part of Community Day is review (and lunch!).
During review time, the tutor will lead review games to practice memory work from the weeks before. It’s fun to see what the children still remember! Through songs, motions, and games, the group is led by the tutor to practice. It is not a test or assessment by any means. It is a time to practice together.
That’s it for Foundations! We have lunch with the Community and our campus even allows us to play outside!
After lunch, my crew heads home.
The rest of the week, my goal is to practice memory work each school day.
This usually takes us 20-30 minutes. It has looked different as our family changes and babies grow…and nap…or don’t nap. The reason I say this is because you don’t have to fit it in so perfectly and scheduled.
Sometimes you just have to make it work as best as you can. So, if you are considering CC, know that you can give yourself grace. It’s OK if you don’t know exactly how to do it. There’s time to grow. If you are already in CC, and you feel like you’re not doing enough with your little ones – well here’s me telling you – it’s OK! We have had weeks that we completely flop on practicing, and we still survive.
We’ve practiced in the car, during lunch, after quiet time, outside, while exercising, on a walk….when I had a new baby, I just had to fit it in as I could.
Now, the baby is starting to follow somewhat of a sleeping schedule, and we are enjoying some routine and rhythm in our own homeschool schedule.
Currently, we’ve been practicing our memory work in the mornings after our devotion time.
Some people call this “morning basket” or “morning meeting”…I don’t call it anything. It’s not quiet, and sometimes it can be a little chaotic. (Real talk!) I take my children into our play area and we listen to the memory work together.
I choose the play area to keep little hands busy. I allow them to play as long as they’re attempting to participate. I expect my 6 year old to say the memory with me at least once. I encourage my 4 year old to join us. (Note the difference in verb there.) During this time my babies are either playing or in my lap. Most days, my 2 year old sings along with us!
My role in practicing memory work is important.
I am the example for my children. My mood sets their mood. If we are all together in a room practicing, I am right there practicing along with them. (And I have learned so much!) I usually just sit on the floor and start reciting along with the app.
Here we are practicing the Timeline Song in our messy play room. The quality of this photo isn’t the best, but we sure are having fun!
We mix it up by how we choose the subjects or how we say the subjects.
Take turns choosing. Write the subjects on the board and point to one. Roll a dice, choose popsicle sticks, make a spinner…change up how you pick your subjects to practice. It will keep things fresh and interesting. I hope to do a blog post soon compiling all these ideas and more!
It’s also fun to change HOW you are practicing. For example, sometimes we assign an exercise to a subject and do that exercise each time we recite the memory. (I participate and count it as a workout!)
We’ve used puppets before, as well. When the subject changes, change the puppet. It’s fun to change your voice for this as well. Get silly and have fun!
Sometimes just a simple voice level change can help add fun to memory practice. Talk with a deep voice. Say it in a whisper. Squeal like a mouse. Pick an accent.
These are all just great ways to keep learning fun! If my children want to play with something quietly while we practice, that’s great. Many days they cartwheel back and forth while reciting. I guess gymnastics and memory work is a great combination for them!
I tell you all of this to hopefully get out of your head that it doesn’t have to be this sit-at-the-table-and-recite-over-and-over kind of drill. Get crazy and have fun with it. Join in with your little ones. You’ll learn a ton and you’ll be making beautiful memories.
We practice the memory work. That’s all!
My goal for the week is to practice memory work each school day. If we’ve done that, we are golden. That’s it, and that’s enough. At these ages, we are just laying a foundation. It doesn’t need to be extreme.
If my children have an interest in a topic we will surely look into it by watching a video or checking out a book. My girls especially love the history sentences, so usually that’s what we dig into.
We’ve read a couple of “Who Was….” books. (Literally a couple – two! Don’t get crazy here.) I believe it was one on Columbus and another on Davy Crockett. They were fantastic!! If you have older children, these would be great to add on for personal reading time. I’ll be honest, I’d love to add more of them into our day. For now though, we stick with simplicity.
I just love how we can follow the lead of what interests our children as we learn about all of these wonderful topics. I am so looking forward to digging a little deeper each year.
I encourage you to pray about Classical Conversations if you feel interested in it.
Don’t let fear or worry stand in the way of doing something new. Talk to someone you know that is involved in a Community. Call a director near you just to get a feel for what it’s like. Ask questions. Leave a comment here or email me!
Planning your homeschool day is important, and it always feels better once a plan is in place. I pray this blog post allows you to feel more comfortable with a decision-whether that means a “yes” or “no”.
We joined Classical Conversations for our second year of homeschooling. I had looked into it my first year, but I was intimidated and nervous to commit. Although it felt like a big leap to say yes this year, we have been so blessed by the program and our community.
In this post I’d like to take you through my fears before starting. There were a few things that caused me to hesitate, and I hope to share them with you in case you have the same thoughts. In a separate post, I will share what a Community Day looks like and how we add it into our homeschool day each week.
It’s important to note the age of my children. Right now I have two children in Foundations that are 6 and 4 years old. I also have a 2 year old and a 5 month old. If you are not sure what the Foundations program is, check out the Classical Conversations website here for a brief outline.
The Classical Conversation Blog has a great article on the joys of the Foundations program. You can find that here.
This post contains affiliate links. If you follow one of my links I earn a small commission at no extra cost to you. Thank you for supporting my blog!
At first glance, Classical Conversations can be intimidating.
The program is jam-packed full of INCREDIBLE information. When I first looked into Classical Conversations, I was scared to have to teach all of the information to my children. What if we couldn’t keep up? What if I was unfamiliar with the topic? What if my children do not enjoy the material? Can we even afford it?
Well, I was wrong to question it on all parts. Once we started, I realized my fears were unnecessary. God has provided us with a lovely community, a beautiful curriculum, and a confidence I didn’t know I needed.
This post is based on my opinion and my experience with Classical Conversations. Please note that every community is a little bit different. So some experiences may differ from mine. For some questions, it is important to contact your local community director for a specific answer.
The Tutor guides us each week on Community Day.
Every Monday we show up for Community Day and there is a Tutor there to help my children (and especially me!) learn the memory for the week. There are songs and motions for the majority of the subjects. We practice all of the new grammar together in class.
The name is “tutor” because YOU, sweet mama (or dad!), are the teacher 🙂 The tutor is there to help lead you into your week.
As my child learns, I am also in the room learning as well. My children are in separate classes, and I go back and forth between the classrooms throughout the day.
Even though they are in a different room, they are all learning the same thing. It’s one of my favorite parts of the program. Our whole family is participating in this together.
Classical Conversations has a guide, an app, and a CD to make practicing memory work so easy.
If I don’t have something memorized, it’s not a big deal. I’ll be honest, there are many weeks where I know absolutely nothing about the topic! It’s nothing to be scared of because I know I’ll learn it with them.
When I used to teach, I’d get asked questions all the time about things I didn’t know. That’s when you say something like, “Wow! That’s a great question. Let me show you how to look up your answer.” My point is…You do not have to be all-knowing!
There are three ways I can provide the memory work to my children. First, is the Foundations guide that breaks down every subject week by week. Follow the previous link and you can actually download the first five weeks for a preview!
Second, is the app that has all of the memorization organized by week. Pick your subject and the week you are studying and the app recites it for you. This is mainly what we use to study each day. I can even connect it to a blue tooth speaker and play it for the whole room to hear.
Last, is the CD. We listen in the car on the way to and from Community Day. Sometimes, we even practice on the go during the week. The CD has more than the app and is set up differently. It comes with three discs. One is songs for the semester. Another is weekly memory, and the third is separated by subject.
I enjoy having both the CD and the app. If you can’t afford both, I’d recommend purchasing the CD on your phone. That’s really what I should’ve done at first, but sometimes I just make spontaneous purchases and then realize later I could’ve saved a little money in the beginning!
All of these tools make it easy for me to provide memory practice for my family.
My children love learning the material.
There is so much to learn, and I’ve loved seeing my children developing interest in certain topics. Our favorite right now is the history songs. Learning about history was never a strength of mine growing up. Honestly, I had no interest in history. I was a math girl… but lately we just want to know more!
We love talking about all of the people and events mentioned in the songs. Everything has a catchy tune. Many nights I wake up singing the timeline song or something from history, but I don’t mind it!
My 2 year old has been singing the timeline song since she was 18 months old! It’s just such a blessing to be able to sit down together with my children while we sing and learn all together.
It’s not about “keeping up” in Foundations.
At this age, they are really just soaking up information and being exposed to so many different topics and subjects.
It sounds odd to some, but once you get to know the classical model, it makes more sense. If you are unfamiliar with the classical model, check out the following books:
These books are constantly recommended to me as a new member to CC, especially the first one.
So, back to the topic of keeping up with the memorization…One of our history sentences this year was about the Boston Tea Party. We sang the song, made up some fun motions and memorized it during the week. That’s all. At this age, we don’t go in to detail about what every little thing is and why it happened. We are just laying the foundation (get it?) for a deeper learning in the future.
Do my children ask questions? Of course! I answer them the best I can. Sometimes I’ll find a YouTube video or a library book if they are interested in the topic, which is a great way to practice interest-led learning. In Foundations, there’s nothing to “keep up” with. It’s just opening their eyes to a world full of knowledge!
When my children are older, I will want to challenge them more, but right now, at ages 4 and 6, we are happy dancing and singing and learning bits of knowledge throughout the year.
Everything is laid out week by week.
I was nervous about teaching all of the material, but there is a Classical Conversations guide that has everything laid out week by week. It’s so organized and helpful! I encourage you to look at the preview of the guide so you can see for yourself how it’s broken down. It makes planning so easy!
Plus, if I do get confused, there is a huge community of Classical Conversations members that are supportive and helpful.
Our own community is like a family, ready to help me as we need it. There’s even bigger communities on Facebook and the Classical Conversations website. At no point do I feel alone in this journey. I know there are so many people out there studying the same things, and it’s comforting to know I can get help if needed.
The cost may seem like a lot at first, but as a big picture, I don’t mind it.
The website sums up the cost as $14 a week for the Foundations program. (I believe it changes once you move beyond Foundations.) That cost is per child, and there’s a couple of reasons I don’t mind it.
First, I had plans originally to put my children in a Christian school. The cost of that is substantially more than $14 a week. So, I feel like I’m saving quite a bit of money…but my children are still receiving the Christian education I desired.
Second, I have 2 children in Foundations, so technically that’s $28/week. That’s less than what it costs for me to feed Chic-Fil-A to my family in one sitting. So….educate my kids or eat chicken? (ha!) I don’t really think that each week, but it definitely puts it into perspective.
I’ve heard if you tutor, you can receive a discount, so that’s definitely something to keep in mind as you consider costs.
I will warn you that at the beginning of the year, especially the first year, the costs do add up and come at you fast.
It’s kind of like a hit-you-at-once sort of thing. It would be helpful to prepare mentally or financially for that.
There is a registration fee, a supply fee, and usually a campus fee. Check with your local community to know for sure what these are. There are also books/supplies you will need to begin.
At the Foundations level, I bought four things, and I’ll explain what they were and how we used them.
First, is the guide which was $99. I won’t have to buy it again and will use it for all of my children. So, it’s a one-time big ticket.
I also bought the CD, which is not necessary, but it has helped us. The CD is $35 and it is specifically for Cycle 3. We will get to use it each time we are in that cycle…as long as my children haven’t scratched it to death by then. (Also another reason I should’ve just downloaded it to my phone…learn from me!)
I purchased the Cycle 3 Trivium at the Table Placemat Maps ($12). This will also be a one time purchase for this cycle. I do not pull these out every week, but we do use them. They are really nice and match the maps we use on Community Day. As my girls get older, I am positive they will be used very often.
The app should be included in this list of costs. It seems pricey, but we use it EVERY DAY. I believe it was around $15. It is specific to Cycle 3.
Finally, each girl needed a tin whistle. I bought them from Amazon for about $12 each. The tin whistles can be reused, as well.
I did not buy anything else, although it was tempting! You will be tempted too! Just remember you don’t need it all at first!! Slow down and stick with the basics. Hopefully this gives you an idea of book costs. If I do my math right, I think that totals books around $85 for two children in Foundations.
I will say that I do wish I had the timeline cards, but we’ve done fine without them. My plan is to start purchasing them a little at a time when I can. That way we will eventually have the whole set.
One more thing about saving costs. Since we cover science and history in our memory each week, I do NOT purchase a separate science or history curriculum. We use library books or videos to learn more about the topics we cover, but I do not feel it is necessary to add anything else at their age or even a bit older.
Making a big decision for your family is a difficult task.
Ultimately, you have to decide what is best for your family. Some of my opinions may differ from yours, our financial situations may be different, and our goals of homeschool may not look the same. You know what’s best for your family.
I encourage you to pray about Classical Conversations if it’s on your mind. I didn’t join my first year, and I couldn’t stop thinking about it. As we got closer to the second year, I knew I was going to have to make a decision. Sometimes, I feel like God uses those thoughts of “Why can’t I stop thinking about this…” to push us to new things.
After a lot of prayer, we felt led to go for it. We took the leap and became a part of a Classical Conversations Community, and I am so thankful we did!
What’s holding you back? Is there something you’re thinking about that’s not mentioned above? Leave a comment and let me know! I’d love to talk to you more about it.
When it came time for me to teach the alphabet to my second child, I ran into a few obstacles. I was new to the alphabet game, and I was working with a completely different personality. I really enjoyed trying new things to help her succeed, and I was also learning in the process!
We’ve had our ups and downs as we learn the alphabet together, but I definitely have my list of favorite tools that have worked for us. I hope by sharing them, it may give you some ideas to try at home. After a lot of trial and error, I was even able to create an alphabet curriculum that has worked wonders. I will share that in this post, as well.
I listed these tools in time order. We started at age three with a more playful approach (#1-6). I knew at that time she wasn’t ready for something intense. We gradually added a few different tools at age four that really helped her to succeed.
This post contains affiliate links. If you follow one of my links I earn a small commission at no extra cost to you. Thank you for supporting my blog!
1. Alphabet Spiral Notebook
When Joanna was three, I was pretty laid back for a couple of reasons. One, I didn’t think it was necessary to get super serious at three. Two, she didn’t sit very long! I didn’t want to push it, so we tried something I called the Alphabet Notebook.
Each week, we went through a letter of the alphabet. The first day, we crafted the letter out of construction paper into a cute animal or object. Next, we glued it into a spiral notebook. The following days of the week, we would use the next page or two in the notebook for writing practice. Sometimes I would glue different letter worksheets in there as well.
The one pictured is handwriting practice pages from Super God Not Super Mom on Teachers Pay Teachers. We didn’t use it all year, but it was a cute resource, and it’s great for early handwriting skills. (It’s a lot more expensive than I remember…I’m wondering if the cost went up.)
This was great for us. We really had the freedom to do whatever we wanted with it. It was low-key, easy to plan, and it’s so cute I can’t get rid of it!
My oldest actually did it with us for Kindergarten, and she really enjoyed it as well! If you follow me on Instagram, I have a whole Alphabet highlight where I show all of these pages. @simply.learning.together.
I hope to one day put together a blog post of my favorite, EASY alphabet crafts. We found almost all of them on Pinterest!
2. Sensory Learning
Sensory learning is great as it is, but my Joanna loves it! She wants to touch everything. So, I made sure to add in some sensory play with letters. Play-doh was a huge hit and a tool we used often (I’ll get to that more below). We also love shaving cream. She has so much fun with it. I always let her play in it for a bit and then we practice writing her name and letters.
I did try a salt/sugar tray once for her to make letters, but I spent most of the time trying to get her not to eat it!
Real Life Moment – Try to ignore the actual garbage on the floor in Evelyn’s picture. (ha!)
3. Cardboard Letters
This one sounds odd, but it was a huge success for learning her name. At the beginning of the year, I cut out BIG cardboard letters for the letters of her name. We spent a couple days painting them and decorating them. Then, I would just play games with the letters.
We would lay them out on the floor and trace them with our finger. We practiced calling out the letter as if they were a flash card. Our favorite was a scavenger hunt where I’d hide the letters and she’d find them and spell out her whole name. These were so fun!
This could definitely be a great tool to teach the alphabet at home, as well. I’d suggest cutting as you learn them so you’re not having to cut 26 cardboard letters at once. Don’t forget to make them fun and decorate! You could display them in a play room/homeschool space…they’re really so cute! And the best part – FREE. She loved these and they’re so easy to pull out and play with.
4. Books
Books are always helpful, but I will say that some books don’t work the same for each of my children. My oldest’s favorite was “The Sleepy Little Alphabet”. She was recognizing the letters at a very young age in this book. It has a catchy rhyme to it and a cute story.
We purchased “A is for Apple” this year, and I loved how it encourages the child to touch the letter and trace. I knew that would be so helpful for Joanna.
There are so many alphabet books out there, but my all time favorites are the “A to Z Animal Antics”. There’s one book for every letter. We found most of them at our library, but I know you can find them online as well. The books go beyond just learning a letter. It tells a story using tons of words that start with that letter, so the sound is repeated over and over. At the end of the book there’s even enrichment activities to take learning even further. These books are fun, well written, and helpful when it comes to learning about the alphabet.
5. Magnetic Letters
I love having magnetic letters to teach the alphabet. We’ve practiced finding our name or finding a specific letter. Now that we are working on lowercase, we can match the capital to the lowercase. You really can do so much with these. The set that I’ve linked is just like the one we have, but it must be updated. This version actually comes with an e-book series that has 40 different activities you can do with your child!
I know it’s so fun for my girls to be able to pick up the letters, touch them, and move them around. Their favorite game is to put random letters in a line and ask me to “read” it. The words make absolutely no sense, but they sure do giggle – and I’d say we are getting good practice with letter sounds!
6. Play-Dough Mats
This falls in the sensory category, but we had our own special journey with play-dough that I wanted to share. I love using play dough to learn. It was especially helpful for Joanna because she loves sensory play. I knew play-dough mats existed, but I didn’t really want to pay the price. I also felt like everything I saw was just the letter on a piece of paper, maybe with a cute picture.
I didn’t think it was necessary to have to pay for that, so when she was three I would just write a big bubble letter on a piece of paper and slip it into a sheet protector. That was our play-dough mat, and it was perfect! No printing, no cutting…easy. If you are just starting out learning letters, I highly suggest this easy, free method!
When Joanna turned four, I needed more of a challenge. I started hunting around to find play-dough mats but was unhappy with the result. To me, they weren’t worth the money. Most of them had the letter and maybe a tracing prompt or two. I wanted more practice for her. I wanted something that I could take out and work with her one on one each week. Building one letter on a mat didn’t help me very much. So, I created my very first resource – Write and Play Alphabet Mats.
Joanna LOVED them. She could make the letters, trace them, write them, color them, find them…it was so much exposure to one letter in multiple ways. The best part, they’re designed so that your child can choose to write or play! We switch it up all the time. Sometimes she does a mix of both.
These mats were just what we needed to add a little fun, and it really helped me see where some gaps were. Suddenly, I started realizing she could recognize the letter easily, but she still struggled to write them…so I worked on that more. By having multiple skills on one page, I could easily assess her progress.
The mats are all set up the same, so eventually she was able to complete them independently. We still use these today, and they have been incredibly helpful for my daughter!
After a few weeks of using the alphabet play dough mats, I started noticing that repetition was really helpful, but we obviously couldn’t do the same play dough mat every day!
This led me to create the Alphabet Workbook. I wanted consistent, repetitive letter practice. We were working on a specific letter every week, and I wanted her to have practice with that letter each day. The thing is… I didn’t want to have to go and search for multiple worksheets each week. Plus, most of them looked the same! I wanted variety.
The Alphabet Workbook is set up to do just that. There are four practice pages for every letter. Each page has different activities. There’s dot sticker/dot marker activities, dice games, ten frame practice, an optional painting activity, and color by number. That’s just a few of them listed. The focus is around one letter while so many other preschool skills are being practiced: shapes, counting, numbers, patterns, graphing, and more!
I have seen tremendous improvement with my daughter after using this Alphabet Workbook. She is finally starting to recognize her letters. She is learning the letter sounds. She can write almost the entire alphabet now. Most importantly, she is enjoying it all in the process! She has fun learning and doesn’t complain about completing a page in this book.
8. Puzzles
I love educational puzzles. It’s kind of like good books to me. I could buy so many, because I think they’re incredibly useful and so helpful! We have a couple of giant alphabet puzzles – the ones that are about 10 feet long (Click here to see one we have). These are great to practice with and I’ll explain how we’ve done it in the past.
You may have to adjust this depending on your child, but it should give you a good starting point of how to play. I organize about 10-15 letters and line them up nice so they are easy to read. I don’t want them upside down, and I don’t want it to be overwhelming by looking at the whole set of pieces.
Next, I ask her to find the letter, and I give hints as needed. (It’s on this side…it’s at the top) Once she chooses the correct letter, we practice writing it on a mini dry erase board. I make her dotted lines to trace if she needs it.
Then we add the piece to it’s correct place in the puzzle and move to the next letter doing the same thing.
Remember, go at the pace of your child. My oldest would’ve loved to play this game multiple times in a row. The first time I played with my second daughter, she made it through about half the letters, and then I could tell we needed to wrap it up. So, I cut out the writing portion, gave her a few more hints, and we finished. The more we played, the more I could challenge her to go a little bit further. Every child is different.
9. ABC, See Hear Do
I can not say enough good things about these books. We have the “Learn to Read 55 Words” book, and all of my children love it. My oldest already knows how to read and she even thinks it’s fun. My 2 year old can actually turn the pages and “read” the sounds. When my 4 year old opened the book for the first time, I helped her read through the first few sounds. That same sitting, she read her very first word – instantly! The book is incredible. Worth. Every. Penny!
Now, I use it as a supplement as we practice letter sounds. The book actually encourages you to introduce it before you learn letters, but we were past that by the time I found it. As we practice letters, I pull it out to practice the sounds and motions. The movements stick and really help my preschooler to remember the letter sounds!
There is a whole set of books that advance as you work through, including blended beginning sounds, blended ending sounds, sight words, long vowels, and more! We do not own them all yet, but I know many will become part of our collection soon once we master all of the letter sounds. You can learn even more about their program and products by visiting their website.
10. Screens – Movies/Apps
I don’t really like to have the TV on much, but I’ll be completely honest, having it on at certain times during the school day helps me get certain things accomplished easier. While I make lunch or while I work with my oldest, I will try to pick something educational or related to a topic we are studying.
There are some great alphabet shows that we’ve watched and probably more for us to discover. So far we have loved Leap Frog Letter Factory and Alphablocks (on Netflix) as well as Super Why (Free on PBS). Catchy songs and fun characters make learning letters fun and easy to remember.
Leap Frog Letter Factory focuses on the letter and its sound. Alphablocks is all lowercase and the shows are very short (10-15 minutes). Super Why covers letters, sounds, spelling, and early reading skills.
I also downloaded a free alphabet app on my phone. It’s called ABC Alphabet Phonics. The point of the game is to select the letter that is said out loud. It’s very basic and it costs nothing. It was playing this game that I realized my preschooler could identify a letter when it was said out loud, but struggled to call out the name of the letter when asked. So, although it’s not the fanciest game on the planet, it really helped me to easily assess her knowledge of letters. Make sure to play with the settings a bit. You can change it to lowercase, sounds, and add helpful pictures.
Every Child Will Learn At A Unique Pace
As I mentioned before, my first two children learn very differently, and I’m sure when my younger two are ready, I’ll have new ways that work better for them. I don’t believe there is ONE right way to teach the alphabet. What works for me, may not work as well for you. However, I do believe it’s important to try new things to discover that special tool that helps your child grow.
So, what are your favorite tools to teach the alphabet? Have you seen success using something that’s not listed above? I’d love for you to comment and share with me what has worked in your home. I’ll be saving ideas for my next two littles as they get older!
You can get flash cards at the dollar store! They’re an inexpensive tool to practice math facts. Let’s steer away from the old, boring drill method and find ways to add in some fun with these 11 flash card games!
If your math book has a section to practice basic facts, try replacing it with one of these flash card games. Get out of the textbook and move around! Having go-to activities like this make it easy to add excitement to learning.
My first grader is using addition and subtraction flash cards. I can do the same activities for my preschooler with simple number/counting cards. You can purchase them through the links or just make a trip to the dollar store and get them cheaper!
This post contains affiliate links. If you follow one of my links I earn a small commission at no extra cost to you. Thank you for supporting my blog!
1. Giant Number Line
Create a giant number line. We did this with sidewalk chalk, but you could also tape sheets of paper together. I just love getting outside whenever we can. Number the line based on your flash cards. For example, 1-20 would be good for addition and subtraction for early elementary. If you’re doing multiplication, number it by 2s or 5s…whatever works best.
Have your child pick a flash card and solve it. Place the card on the number line according to it’s answer. So, 2+3 would go on the 5. Some of your cards will have the same answer, and that’s okay. Just stack them on top of each other or in a straight line.
2. The Floor is Lava
Don’t you remember playing this as a kid? Gather as many pillows as you can and place them on the floor. Make sure to spread them out. Place a flash card on every pillow. Your child will jump from pillow to pillow solving math problems. It sounds so simple, but it is SO fun!
Once he/she gets to the end, jump all the way back to the start – don’t fall in the lava!! Since I introduced this game to my girls, they’re always asking to play!
3. Shaving Cream
I’m a huge fan of shaving cream. You’ll probably read about it a lot here, but it’s because you can do so much with it, and it’s a blast. It’s another dollar store treasure! Now, you’ll have to help with this, because you’ll be the only one with clean hands.
Every time I spray shaving cream on the table, I always allow a minute or two of just free play. It helps!
Place 2-4 cards in front of your child. He/She can write the answer in the shaving cream. Erase and repeat.
Change it up: Siblings can challenge each other. Or, have your child write a problem and you solve it. They’re the teacher, so it’s important to check your work. (See what I did there? They’re solving it too!)
4. Dry Erase Pocket
If you don’t have dry erase pockets at home, they are totally worth the cost. Place as many flash cards as you can in the dry erase pocket. Have your child write the answer on the cards. This is great for independent work.
If your flash cards are double sided, flip the pocket over and do the back!
5. Battle/War Game
This is just like the traditional card game. Two people go against each other and flip a card. The highest card wins. I even had my girls play against each other with different cards. My preschooler had just a number and my first grader had an addition problem. Adjust it so that it works for your children.
6. Scavenger Hunt
Hide the cards around your room/house. Have your child find the cards. Once a card is found, write the problem and answer onto a paper, clipboard, notebook – anything!
The important thing is don’t forget where you hid them! Been there, done that.
7. Squirt the Answer
This will take a minute or two of prep. It’s an outside flash card game using sidewalk chalk and a spray bottle (dollar store! See a pattern?). Write the answers to your flash cards on your driveway/patio. Spread them out to encourage a little movement.
For Addition/Subtraction, I would write 1-20. This would be great for my preschooler as well learning numbers 1-20.
For multiplication, you can write the products.
Now, show a flashcard, and when your child solves it, he/she will spray that number. It doesn’t have to be washed away completely, because it will probably get sprayed again.
You could also do it backwards. Show a number card (Let’s say 8) and your child can spray all of the addition problems that equal 8! (2+6, 4+4, 3+5…and so on!) It’s a great way to memorize basic facts.
8. Exercise!
This is another great activity to get moving. I love exercise activities like these because my children usually forget we are actually learning. They’re having so much fun! You have to be intentional with this one. Pick the right kind of flash cards. I used addition cards and found about 15 cards that had the sum of 1-6. Next, I made a key and gave each number (1-6) an exercise.
Show the flash card and have your child answer. Whatever the answer is, that is the exercise you complete.
You could find cards with the sum of 10-20 if you want to make it more challenging. If you wanted you could do 1-20! You would just have to come up with 20 different exercises.
For multiplication you could set it up to where you give a range. For example, if the product is between 10-20, you do jumping jacks. If the product is between 20-30, you skip around the room, and so on…
Have fun with this! Join in if you’d like – it’s an easy way to add a little exercise into your day. It would also be a PERFECT rainy day activity.
9. Sidewalk Solving (or Driveway)
If you have a sidewalk in front of your house, this could be so fun. We do not, but I was able to set up some giant squares with chalk in our driveway The concept is simple. Give your child some sidewalk chalk and place a flash card in each square. Your child will walk to each square solving the flash cards and writing the answer in the square.
This would also be great writing practice for your preschooler. Place number cards in the squares to practice writing a number.
10. Comparing
This activity compares two flash cards. The supplies needed are flash cards and popsicle sticks. If you don’t have the sticks, use anything with that shape (crayons, sticks, pencils, toothpicks…)
I set mine up around the table. Each spot had two flashcards and two sticks. My first grader solved each card and wrote her answer on a white board to help her remember. Next, she shaped the sticks into the correct comparison sign: greater than, less than, or equal to.
11. Building Blocks
Pick any type of building blocks: legos, wooden blocks, math cubes, PicassoTiles… This is a great activity for addition flash cards or simple counting. Lay a few cards out on the floor/table. Use the blocks to visualize the problem. Here’s an example – The flashcard says 5+4. Pick 5 blocks in one color and 4 blocks in another. Then, solve.
Valentine’s Day is almost here, and it’s always fun to prepare something special to celebrate. There have been times when I’ve hunted around for different activities to print and cut and prepare…but I end up searching and searching and wasting time. I want it to be simple and in one place. So, I’m sharing a Valentine’s Day activity that you can do for just about every subject.
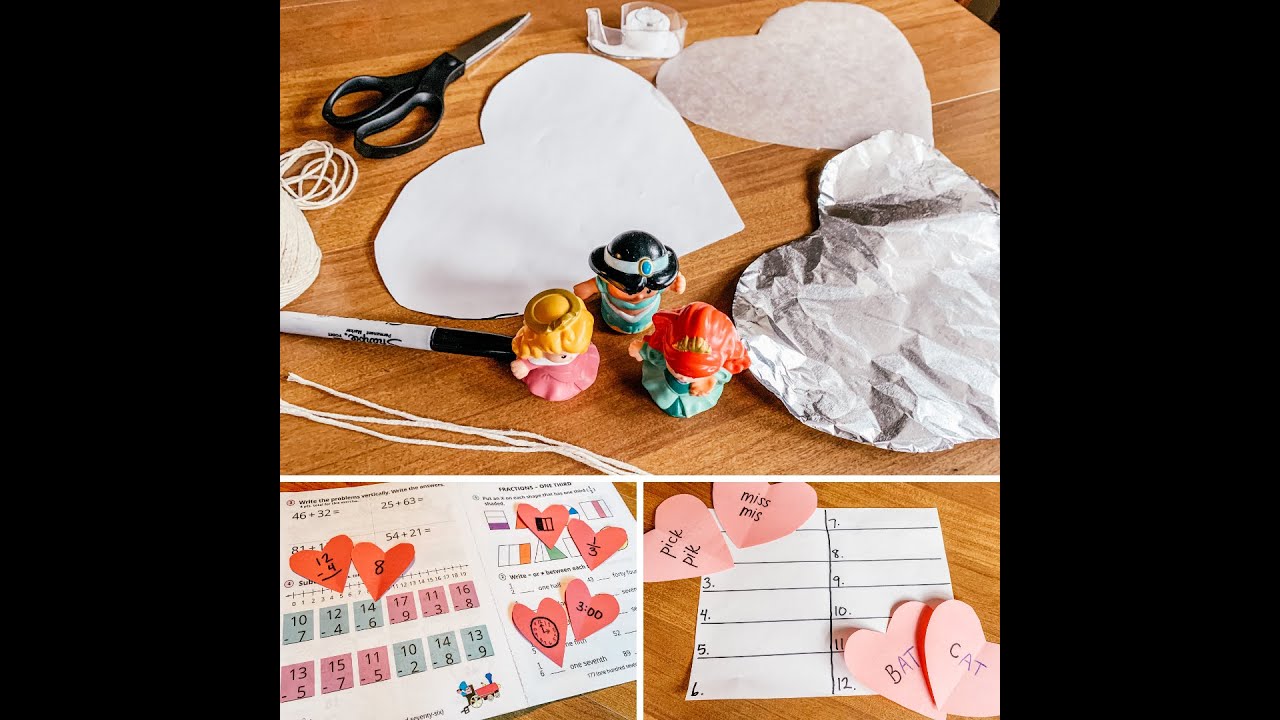
All you need is materials around your house – the prep is easy!
Some of the activities require a teensy bit of prep from you, but go ahead and look through – decide which are your favorites and how to best plan for them. I’ve recorded a video of myself doing the actual prep. It’s a time lapse video, so I obviously don’t move that fast, but the real time of setting all of these activities up was about 30 minutes. That’s not bad – 30 minutes of planning and you have an entire day’s worth of Valentine’s Day learning! It’s worth it.
Bible/Devotion – “Love is…”
Read 1 Corinthians 13:4-7. You are going to be discussing what love is and isn’t. The verse will state just that. Now, get ready to get a little messy. Sit at a table/counter and spray shaving cream on the top. Give your kids a minute to just mix it around and enjoy.
Talk about each of the words describing love and have your child write the word in the shaving cream. If you have a younger child, you could have him/her write the first letter. For example, love is “patient” (P), love is “kind” (K). If you wanted to speed it along a bit and you have multiple children, you could give each child a different word.
Here’s the trick – don’t let them erase and play until you discuss an example of each trait. So one might say, “I can be patient when I wait for my turn with the toy.”
The bible also talks about what love is NOT. While discussing these, put an “X” through the words and discuss their meaning.
The best way to clean up is with a wet washcloth. Just wipe and rinse a few times, and you’ll be all set. Whatever room you are in will smell quite delightful. To close the lesson, remind your children of our greatest Valentine, Jesus. Just as we erase the words, He wipes our sins clean and forgives us. He loved us so much that he died on the cross to save us. Read John 3:16. “For God so LOVED…”
Math – Matching Hearts
You need 5-10 minutes to prep for this. (See Video) Grab 4-5 sheets of red/pink paper. Stack them together and fold hot dog style. (That’s the long way.) Cut out four hearts along the crease.
Think about what your child is practicing in math. Use the hearts to make matching sets. Get the problems straight from the math book. You don’t have to come up with it on your own! Maybe your child is in first grade like mine and you’re practicing basic addition and subtraction, telling time, or fractions. Write the math problem on one heart and the solution on another. That makes a match. Make as many as you please. Ten is a good goal, but more won’t hurt.
If you have a preschooler, practice numbers and counting. A match could be four circles on one and the number four on another. Or, match shapes. Maybe you’re ready to start some simple addition. Pick an activity that will best benefit your child.
Language Arts – Write the Room
You’ll need more paper hearts for this, but you can change the color to mix it up! (See Video) If you’ve never played write the room, I’m so excited for you to try it. It’s a favorite in our house. The way it works is there are words/prompts placed around the room. The child goes around and writes the word or an answer onto a recording sheet. It’s a great way to get moving.
Once again, use your curriculum to see what you’re child is practicing. Maybe it’s CVC words, consonant digraphs, blends, sight words. Little ones can write letters or draw pictures. Prep your paper hearts with the words and tape them around the room. To help your child stay organized, it’s best if you number the hearts and number the recording sheet. When you’re ready, let them loose!
Writing/Handwriting – Send a Valentine
Send someone special a letter for Valentine’s Day. Discuss the components of writing a letter. Challenge your student based on their writing abilities. You can always help as needed. Send it through the mail. This will give you even more teaching moments as you talk about addressing an envelope and putting it in the mailbox. Don’t forget a stamp!
Snack Time – Cookies or Fruit
I’ll share a couple options and you can decide what works for you. Or, do both! First, my favorite is always baking cookies to decorate. Make it really simple and buy the package of dough/mix at the store. There is no shame in that. You have an exciting day ahead! (Also, it’s just easier!) If you have cookie cutter hearts, you can use them. Otherwise, just make a regular cookie and you can have your kids decorate with pink/red icing and sprinkles.
Another option is to cut up bite size pieces of fruit. Give your child a plate and have them create a heart shape with the pieces. Then, of course, eat and enjoy – so simple!
Art/Craft – Painting Hearts
This time let’s have the kids cut the hearts! Teach them the process. Fold a piece of paper and talk about symmetry – that’s a good word! Each child will need 2-3 different sized hearts. I found this craft from A Dab of Glue Will Do, and you can see it here. You’ll be taping the hearts to a piece of paper and painting all around it. Be sure to paint the borders of the heart first. When your child finishes painting, remove the hearts for a fancy reveal!
You can paint thumb prints as the site suggests, or try painting with anything! Cotton balls, q-tips, sponges, paintbrushes…get creative and let your child pick something fun and new.
History – Valentine’s Day
Whenever we want to learn more about a topic, I love using YouTube. There’s so much great stuff there, but just make sure to view it before your kids do. Below is a video I plan to show my children. It’s about a minute long. It’s a quick way to get a little history lesson in for the day, and it may bring up some fun discussions!
Science – Heart Parachutes
This is a quick experiment you can do at home with stuff around the house. Those are my favorite kind. The question we will be answering is – How does the parachute material affect the flight of the toy? (See Video for prep)
First, you’ll want to test at least three types of material. Start with an 8.5 x 11 in piece of paper and cut out as big of a heart as you can. Now, use that heart to measure your other materials and make the same shape. (foil, wax paper, cloth, constructions paper, plastic bag…) You should have at least three heart shapes in different materials – all the same size.
Next, gather string or yarn and cut three pieces for each parachute, all the same size. Tape the string to the top of the parachute. It’s best to spread them out in a triangular pattern. I used masking tape, and it worked just fine. Do your best to keep all the string the same size and taped the same way. These are our controlled variables (another great word! Go ahead – jump into that discussion as you do the experiment. The teaching moments are endless.)
Normally, you’d want to test these with the exact same object pulling on the parachute, but we are going to break the rules a bit and use an almost-exact-shaped-toy. You need three. We used the little fisher price princesses. They’re basically the same size, just painted differently. You could try army men, hot wheels, small dolls. Make sure it’s not too heavy. Tape the string to the toy.
Set it up like a winner-moves-on tournament. You can fly them over the railing on your stairs. Or, stand carefully on a chair. Observe which one flies in the air the longest. That’s the better parachute – not the faster one. The “winner” goes against the third parachute, and so on. I would test each flight about three-five times to make sure you have a clear winner. Here’s a quick tip – if your phone has a slow motion recording mode, you can record the flights and see the winner much easier. Plus, who doesn’t love a slo-mo video?
Once you tested them all, talk about why you think that material was the best!
It’s a whole day of celebrating and there was so. much. learning!
So, how fun does that sound? Which one is your favorite? Anyone think they’re up to doing ALL of them? The most important thing to remember is not to stress. If you’re worried about time, split it up into two days. Or, pick just one, and call it good. Don’t let it get you worked up about fitting it in. Whatever you decide to do, I’d love to hear about it. Leave a comment or share it with me on social media. Have a great Valentine’s Day!
BONUS: Valentine’s Day FREEBIE!
Here’s a fantastic little activity book for your young learners this Valentine’s Day. Use dollar store stamps, stickers, or even manipulatives to add some hands-on fun! This freebie is only available for the month of February so get it while you can! Sign up for my email list and it will get sent right to your inbox today.
When I first found out I was pregnant with my fourth baby, I was immediately scared of what it would be like to homeschool with an infant at home with us. I knew it could be done, so I just prayed for that peace until the time came.
As I write this, my baby is 4 months old.
We are still adjusting our homeschool each day/week to accommodate the baby. We have great days and we have everyone-is-in-tears-bad days. So, although I don’t have the complete solution to making it 100% successful, I will share with you some things that have helped me while homeschooling with an infant.
1. Plan Ahead – Before the baby is born
The best thing I did was start our homeschool year early. My baby was due in September, and we normally take summers off and start mid August. However, with the baby arriving shortly after we started, I wanted to set up a good routine ahead of time. By starting a few weeks earlier than usual, I gave myself the confidence to take a break when the baby was born. We were able to get in a good 8-9 weeks of school before we paused, and I felt so much better knowing that was done.
2. Rest and Take a Break
Give yourself permission to just stop. Once that baby is born, you need to rest and recover. Your family is adjusting and changing, and it may feel a little crazy at times. REST. Don’t feel pressure to start school up again. (That’s why you planned ahead. See #1) Give your other children the freedom to create and use their imagination. Teach them how to be your big helpers. Let go of school.
3. Start Back to Homeschool SLOWLY
One thing I did after a couple of weeks was plan one “fun and new” thing to do the next day. It could be a craft, baking, a walk – nothing intense. It was one task for us to look forward to and complete together. The activity acted like a practice run for trying to add something into our day. You can also start a new read aloud. Focus on that and nothing else. The reading will be so good for the kids, and you can sit and recover.
Next, I would consider adding maybe one or two subjects at a time. There’s no need to jump into everything at once. Add your book work slowly. It will be less stress for everyone.
4. Wear Your Baby
Baby wearing is a game changer.I wish I did it more with my other children. If the baby isn’t taking a nap, I can always wear him and he will sleep on me while we need to finish something up. If we are out and about, I never worry about napping for this same reason. Plus, you get both hands when you wear baby! He is happy, all snuggled up to mom…it’s a win-win! I use a Baby K’Tan, and I couldn’t live without that thing. I’m not sure what I’m going to do when he gets too big for it!
5. Work on Sleep for Baby – But not right away
I am not good at sleep training, because I’m a bit of a sucker…I love rocking my babies. I am trying to start good sleep habits as best I can. It’s a slow process, but I do think it’s helpful. My third child was not the best sleeper and getting her to take a nap would take forever. I hope to set better routines with this baby. Although he is still not on a consistent schedule, he goes down for a nap pretty easy and that’s been so helpful!
Be patient with yourself. This is not going to happen quickly and easily. (This is also me giving myself advice as we are still working on this!)
6. Do NOT Try to Schedule Your Days
Just let it go…it’s not going to happen. I have to tell myself this daily! An infant does not have a set schedule. You can read all the books you want, but every single day is going to be different. One morning he will nap for 3 hours and the next morning will be 20 minutes. It’s going to be tricky to figure out how to plan everything out at first. (Another good reason to take a long break.) Once you get to know your baby better, try to develop a rhythm, not a schedule. This took about 6-8 weeks for me to “figure out.” (quoted because it’s still a work in progress) I will also let you know that my son is 4 months and still does not take consistent naps. It’s definitely tough to try and balance it all while also doing school, but this is all temporary. I feel like I’m going to blink and he will be turning one. The days are long, but the years are short.
7. Get Outside – Even You, Mama!
There is nothing like fresh air. God created us to be a part of this beautiful earth, and there is something so healing about experiencing His creation! It is so, so easy as a mom of a new baby to lock ourselves indoors and get wrapped up in feeding, and changing, and napping, and cooking, and cleaning, and burping, and wiping…..I’ve done it. Every. Time. Take some time each day to step outside. Breathe in that fresh air. Go on a walk. Sit on your back porch. Don’t stay cooped up inside.
8. Self-Care
I’ll admit, I’m not the best at this, but it really is necessary. Take time for yourself. This could be something as simple as taking a nice bath, or setting a goal to get dressed for the day! Or, you can go even further and schedule a nail/hair appointment. Set a date with some friends. Try to do these things regularly to give yourself that mental boost! Do something you love and take care of yourself so that you can take care of your home as your best self.
9. Find Your Support Squad
Find that friend that you can count on for anything – the one that’s been in similar shoes as you. Or, talk to the person you can totally be yourself with and let out any good/bad feelings you have. Get the support. I just love a good mom-chat with my girls. It makes me feel so renewed and happy. If you’re not able to feel better, talk to your doctor. Post-partum is so tough. Hormones are crazy and emotions are constantly on a roller coaster. Don’t hesitate to get the support that you need.
10. Lean on the Lord
This should be number one. I first titled this “Give yourself grace”, but then I realized, it’s not about you making yourself better. You can’t do it all. Nothing is going to fully prepare you and make it easy. It’s hard work having a baby. Add on homeschooling to your day, and it gets really tough to balance it all. I can leave you with these ten tips, but I’ll tell you this – I STILL struggle with a lot of them. I forget to take care of myself. I don’t always get fresh air. I don’t have the best napper/sleeper, and sometimes I just plan too much for the day! No one is perfect. Pray about this new transition. Let God take on your burdens and give you the strength for each day. Be kind to yourself and know that out of all the women in the world, God chose YOU to be the mama for your kids. YOU were the perfect pick for Him.
Reading Aloud is such a great habit to form with your family, but what if you could take it one step further?
It all started for my family during our first year of homeschool. We were reading the Little House series and kept talking about what it would be like to live like Laura and Mary. We were craving that experience, and I wanted my children to understand how different it was back then. As a result, we started digging a little deeper.
We started planning simple activities and lessons based on our chapter readings.
It was almost as if we were diving into the book world and getting lost in reading magic. My children could understand and comprehend better, and we were having so much fun learning a variety of different lessons…this includes me! I learned right alongside them.
The Read Aloud Experience is designed to be low budget, low stress, and without all the “extras”.
I can’t tell you how many times I’ve downloaded a unit/curriculum for my children only to find out I need to buy 5-10 specific books to go with it. Or, it’s asking for something I can only find at a craft store, and I really don’t want to load up my car and make the trip! Many times it ends in money wasted or just an incomplete lesson.
Most supplies in the Read Aloud Experience can be picked up at your trip to the the grocery store, and there’s no required book list.
I don’t always have time for that extra craft store trip, so adding a thing or two to my grocery list makes it so easy to prepare. As much as a I would love to buy ALL.THE.BOOKS, I just can’t. So, I take advantage of my library as much as possible.
The Read Aloud Experience provides you with a list of library topics that go along with each chapter. That way, you can grab a few books (for free!) to enhance your reading. I love doing library pick-up because I search the topic and look at the book covers to figure out what I like best. I add it to my hold cart, and picking them all up is like Christmas! I have no idea what’s inside, and most of the time I am positively surprised!
“She found herself in one long gallery whose walls were covered with these portraits.” The Secret Garden – Create a self-portrait
A variety of activities are included.
History, science, arts/crafts, music, food, nature, life skills, writing, map skills, and more!…these are the types of activities you’ll get to experience. Some are as simple as – go on a nature walk and use your five senses. Others will require a teeny bit of set up – like a science experiment or craft.
Remember, nothing is too crazy. I have four kids and 2 are under 2. I don’t have extra time to do something extremely intense. If I can do it, so can you!
All book suggestions and activities are optional.
Not feeling up to an extra activity? No problem! Is Thursday your afternoon sports practice and your short on time?…it’s ok! Nothing is required. If you’re in love with the activity but don’t have time to complete it, save it for the next day or move it to the weekend when you’re kids are wondering what the plan is for the day.
“In one room, which looked like a lady’s sitting-room, the hangings were all embroidered velvet, and in a cabinet were about a hundred little elephants made of ivory.” The Secret Garden Elephant mini-lesson
Everything is made to be flexible and adjustable for your family.
A supply list and library topic list is included for every chapter. A Planning Guide is also provided so that you can decide what works best for your family. The Read Aloud Experience can revolve around your routine and your rhythms for the day.
Involve your whole family – all ages.
Everyone can participate in the Read Aloud Experience. It’s like your own little mini book club inside your house. It’s so fun how we all can talk about the book and the things we’ve learned. Dad is usually working during the day and misses the reading, but he always gets to read our library books before bed, learning with the kids. The babies don’t always get to participate in crafts and activities, but many days they’re on the floor listening to me read.
“The skipping-rope was a wonderful thing. She counted and skipped, and skipped and counted, until her cheeks were quite red, and she was more interested than she had ever been since she was born. ” The Secret Garden – Jumping Rope
Easily incorporate the Read Aloud Experience into your day.
Simply add the read aloud to your day and pick and choose activities as time allows. One chapter a day – It’s that easy!
You can also use this as a break from your language arts curriculum. You know that funk you get in when you just need a change? This is exactly what we did, and it was wonderful. There is just so much to learn from reading literature together!!
It is a novel unit that leads you to discuss story elements, vocabulary, and comprehension while diving into other subjects, as well. At my house, we have placed the curriculum workbook aside. Honestly, it got boring! I dreaded doing it. Now, we complete our read aloud experience, a quick phonics page, shared reading time, and that’s it for language arts. It’s been so nice and refreshing.
This is also great when you’re taking a break from school in general, and you still want to have a little bit of structure. For example, this could be summer, holidays, or a break after a new baby.
You can get the entire Read Aloud Experience forFREE!
Still unsure if this is right for your family? Don’t believe me that it’s easy and low stress? Check it out for yourself and decide. You can get the entire Read Aloud Experience for The Secret Garden free and test it out for yourself.
Remember that just reading to your children is going to be beneficial and time well spent. You’ll always cherish that time together. The Read Aloud Experience allows you to take it one step further with ease.
Complete the included science experiment and take a break from your science curriculum that day. Save the activities for a rainy day when you can’t get outside. Or, plan to do them in the afternoon during that awkward time when you’re kids keep asking about dinner. (Anyone else?)
Most importantly, have fun with it! Get the whole family involved. There’s nothing better than gathering around a great book.
Check out the following links for more Read Aloud Experiences:
We use cookies to improve your experience on our site. By using our site, you consent to cookies.
Cookie Preferences
Manage your cookie preferences below:
Essential cookies enable basic functions and are necessary for the proper function of the website.
Name
Description
Duration
Cookie Preferences
This cookie is used to store the user's cookie consent preferences.
30 days
These cookies are needed for adding comments on this website.
Name
Description
Duration
comment_author
Used to track the user across multiple sessions.
Session
comment_author_email
Used to track the user across multiple sessions.
Session
comment_author_url
Used to track the user across multiple sessions.
Session
WooCommerce is a customizable eCommerce platform for building online stores using WordPress.
Name
Description
Duration
wp_woocommerce_session_
Contains a unique code for each customer so that it knows where to find the cart data in the database for each customer.
2 days
woocommerce_recently_viewed
Powers the Recent Viewed Products widget
session
store_notice
Allows customers to dismiss the Store Notice.
session
woocommerce_snooze_suggestions__
Allows dashboard users to dismiss Marketplace suggestions, if enabled.
2 days
woocommerce_dismissed_suggestions__
Count of suggestion dismissals, if enabled.
1 month
woocommerce_cart_hash
Helps WooCommerce determine when cart contents/data changes.
session
woocommerce_items_in_cart
Helps WooCommerce determine when cart contents/data changes.
session
WPForms is a user-friendly WordPress plugin for creating custom forms with drag-and-drop functionality.
Name
Description
Duration
wpfuuid
Used to track user interactions with forms.
11 years
Statistics cookies collect information anonymously. This information helps us understand how visitors use our website.
SourceBuster is used by WooCommerce for order attribution based on user source.
Name
Description
Duration
sbjs_session
The number of page views in this session and the current page path
30 minutes
sbjs_udata
Information about the visitor’s user agent, such as IP, the browser, and the device type
session
sbjs_first
Traffic origin information for the visitor’s first visit to your store (only applicable if the visitor returns before the session expires)
session
sbjs_current
Traffic origin information for the visitor’s current visit to your store
session
sbjs_first_add
Timestamp, referring URL, and entry page for your visitor’s first visit to your store (only applicable if the visitor returns before the session expires)
session
sbjs_current_add
Timestamp, referring URL, and entry page for your visitor’s current visit to your store
session
sbjs_migrations
Technical data to help with migrations between different versions of the tracking feature