
Sometimes I look at a lesson and think, “This is going to get frustrating today…” That’s when I know I need to change it up. I usually do this by throwing in something hands-on or by simply changing up the routine a bit.
In the early years, we are always practicing addition, so it’s a go-to section for me to add something new. In this post, I want to focus on addition activities for your homeschool math lesson. These are great to break up a lesson, add some hand-on learning, mix up your routine, or just to PLAY with math.
I’m keeping it simple by using things you probably already have around your house! We take the problems straight from the math book and then skip the section in the text. It’s actually quite fun to scratch it out and move on. PLUS, it’s no extra work for you coming up with problems.
You could also do these activities with addition flash cards. Check out my post on more flash card activities here.
I feel like this may be a growing blog post. I come up with new things often to play with my daughter and I want to add them here as we do. I will start with simple addition, but there are some activities that could be used with older grades as well.
This post contains affiliate links. If you follow one of my links I earn a small commission at no extra cost to you. Thank you for supporting my blog!

Magnet Tile Ten Frame
You’ll need: Magnet Tiles (2 different colors), Optional White Board and Dry Erase Marker
The image above isn’t the typical ten frame you see. However, our Horizons math book had it set up like this, so this is how we practiced it on this day.
We use the Picasso Tiles at our house. They’re affordable and provide tons of fun! Thanks to the square shape of these tiles, you can easily create your own ten frame. If you have a big white board, you can create an actual frame on it using a marker. Fill in the spaces as you complete the problems.
For example, 3+5 – Place 3 blue tiles and 5 orange tiles together on the frame.

Legos
You’ll need: Legos – two different colors
The point of this is to stack the legos together to make one big tower. If the problem is 7+5, stack 7 red legos and then add 5 yellow legos on top. Count the total number in the stack to get your answer.
Draw out of a Hat/Box
You’ll need: A box or bag
There’s something about drawing out of a bag/box that adds excitement. Throw some flashcards in there or write the problems from your book onto sheets of scratch paper. Sometimes we even cut the problems out of our textbook!
Have your child draw a problem and solve. It’s that simple! Add some blank cards in there with wiggling cues. For example, “do 20 jumping jacks” or “march around the room”. This will add some fun movement as well.

Dominoes
You’ll need: Dominoes
When we’ve done this in the past, I only chose five or six Dominoes. I have my daughter actually write the problems out in order for her to get the writing practice. We talk about the math signs and what each one means.
A dry erase pocket is perfect for this. Each side of the domino is added together to get a total. Write the addition problem and solve. Or, just discuss each side and count the total number of dots.
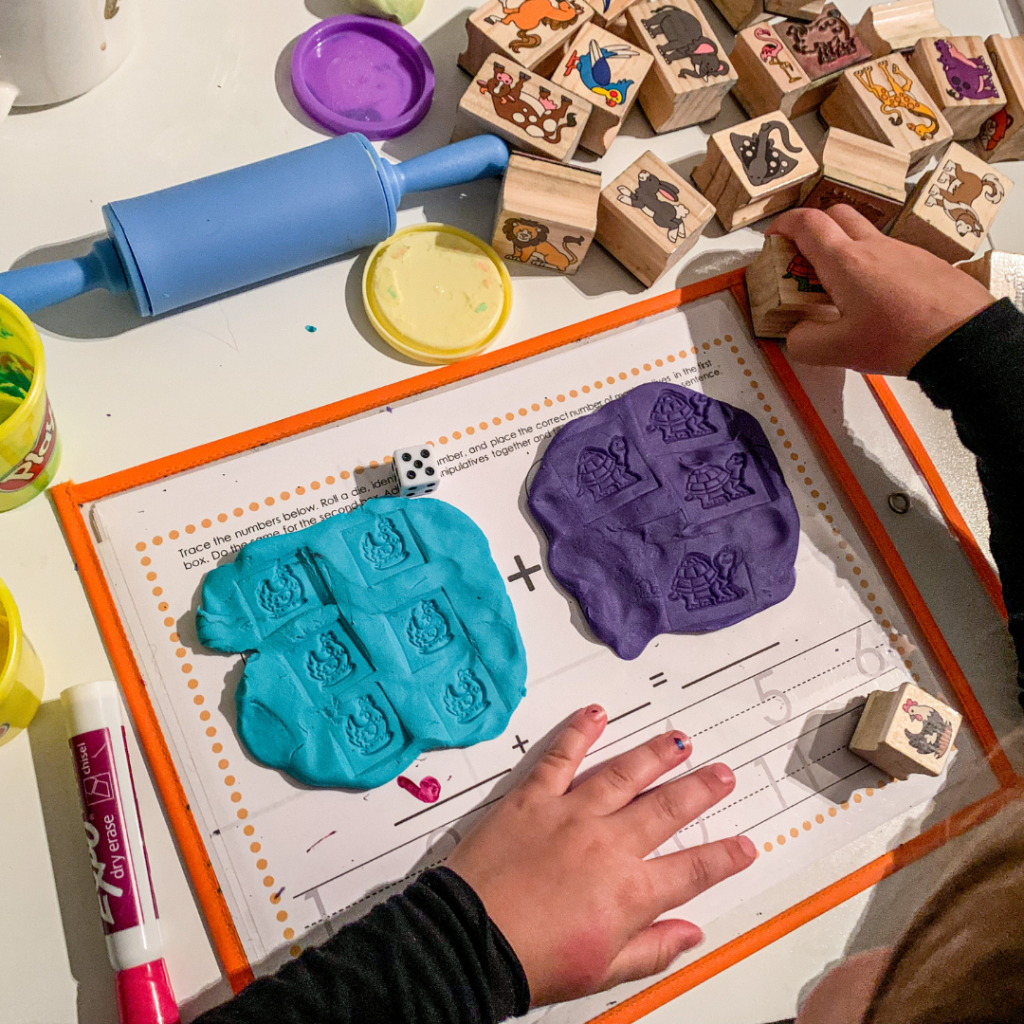
Simple Addition Math Mat
You’ll need: Addition math mat, counters, writing utensil
This addition math mat is perfect for when you are just beginning to start addition and you can use it over and over. The best part is there are traceable numbers on the mat to help with writing.
The directions are on the mat, but you simply roll a die and place that many counters in a square. We use teddy bear counters, but anything works. Do the same for the second square. Write your math problem, and solve.
We’ve also used this mat with play doh and it was super fun! Roll out 2 big squares of Play Doh on to the squares on the math mat. Use stamps (yes, stamps!) as your counters. If you’ve never stamped Play Doh, then you must try this! Add them all up to get your total.
Unifix Cubes
You’ll need: Unifix Cubes
As mentioned before, use the problems straight from your math book or for a little twist, roll a die for each addend. The Unifix Cube activity really follows the same guidelines as the Lego activity above. However, the great thing about these cubes is they really do stick together nicely. The variety of colors makes it a lot of fun.
For a special reward, try making a Unifix Cube rainbow tower. Start with red. Roll a die and stick that many red cubes together. Next, move to orange. Roll the die and add that many orange cubes to the red. Do this for every color of the rainbow. Can you count them ALL at the end?

Secret Picture
Every child will have their own taste when it comes to games. This one I made especially for my daughter who loves pictures.
You’ll need: Coloring Page, Construction Paper, glue stick, scissors, writing utensil
Glue the coloring page to the center of the construction paper. Flip it over so that you only see the solid color. You are going to cut this into six sections. I numbered mine so I could keep them in the right order.
Cut the paper in half (long ways). Then, cut each half into thirds. You will have 6 pieces. On each piece, on the blank side, I wrote 1-2 math problems from her textbook.
When it was time for her lesson, I told her there was a surprise on the back side of the paper, but she would have to finish to see. As she solved the problems, I reminded her – nooo peeking!
Once the problems were solved, we taped them back together (This is where the numbering helps) and she finally flipped it to reveal the secret image!
She was so surprised and immediately asked to do it again. We are looking forward to another secret picture activity soon. As a bonus, she even colored the picture later that day.

Matching
You’ll Need: Constrution paper, scissors, writing utensil
I always use my child’s textbook for the math problems (no extra work for me!), so for this activity I determined how many total problems needed to be solved. It happened to be around February, so I went with a Valentine theme. I cut 8 red hearts and 8 pink hearts.
Next, I wrote the addition problem on PINK hearts and the answers on the RED hearts. This made the game flow a little bit easier
We played the game following the same guidelines as the popular “concentration” card game. If she flipped over a card with an addition problem, she solved it first and wrote the answer. This meant she only had to solve it once.
It’s so helpful to break up the problems like this and a lot more fun to do than out of a big group of problems in a book.
Whenever it was my turn, she still solved the addition problem I flipped over, but I wrote the answer.

Not an Activity, but a TWIST
You don’t always have to plan out a separate activity to add something fun to your math lesson. A simple change or twist can really mix up the lesson and make it fun. Here’s a quick list of ideas to do just that:
- Dry Erase on window/mirror
- Toss a ball back and forth as you work through the lesson
- Take the problems out to the sidewalk and use chalk
- Solve and show – write the answer on a mini dry erase board and reveal to mom (This is so incredibly simple, but it’s DIFFERENT, and sometimes a small change does big things!)
- Exercise between problems: jog, jumping jacks, squats, lunges. You could even roll a die to figure out what the exercise is going to be
- Go outside! Solve a few and ride your bike up and down the street. Come back and do it again. No bike? Jog around the yard! Enjoy the fresh air!
- Cut out the problems and hide them around the house. Go on a scavenger hunt. (This is one of our favorites!)
What’s your favorite way to mix up an addition lesson? Try out an activity above and share it with me on social media (@simply.learning.together).
Leave a Reply